Maps of Zelda

The Lost Woods

Objectives: Find Saria and learn "Saria's Song"
1. The Skull Kid on the log needs someone to accompany him. Play "Saria's Song" while standing on the stump opposite him and you'll be rewarded with a Piece of Heart.
2. The Business Scrub on the south side of this room will sell you the ability to carry more Deku Sticks for 40 Rupees. What a bargain!
3. Hit the target with your slingshot. If you can score three bull's eyes in a row, you'll win a bigger bullet bag.
4. Test your memory in a jam session with the two Skull Kids on the tree trunk. Win rupees and a piece of heart if you survive through three rounds.
5. Under the arch here lies the doorway to Goron City. To use it, though, you must have bombs on your person: boulders block the path. Of course, the next time you're in Goron City, you might want to clear the path from their side.
6. At the bottom of the pool, you'll find a doorway to Zora's River. It's deep, so make sure you have the Silver Scale before you dive.
7. Defeat the two Business Scrubs here and they'll offer to sell you items at extremely inflated prices!
8. The hovering butterflies mark a hidden hole. Below you'll find the forest stage. Try your masks out on these discriminating critics!
9. Until you visit Princess Zelda, you can go no farther than this room. After you recieve your official mission, though, the passage opens to the Sacred Forest Meadow.
10. In the Hidden Hole beneath this boulder, a Business Scrub will grant you the ability to carry more Deku Nuts...for a price.

Kakariko Village

Objectives: Find the gate to Death Mountain and Show the guard Zelda's letter
1. House of Skulltula
2. Impa's House
3. Unfinished house
4. The Windmill
5. Graveyard Entrance
6. Granny's Potion Shop
7. The Little Boy's House
8. Gate to Death Mountain

Death Mountain Trail

1. Secret Caves: Two of these areas are hidden on the trail up Death Mountain. To enter, you need a bomb or the Megaton Hammer. Inside the first cave, you'll find a Gold Skulltula; the second, near Goron City, houses a Treasure Chest with a Purple Rupee
2. Dodongo Cavern: Home to the most delicious rocks in the area, this cave is overrun by the Dodongos the cave is named after. To make matters worse, Ganondorf has sealed the entrance with a huge boulder. Looks like explosives are in order.
3. Fork In The Road: From this point, you can either climb the steep hill to Death Mountain Crater or comtinue up the trail to the right to Goron City. The Goron there will tell you about the Great Fairy Fountain outside the crater, but you can't reach it until you have the Bomb Bag.
4. Goron City: This town, carved from tunnels in Death Mountain is home to the Gorons. People often mistake the rock-like Gorons for boulders, but if you move close, they sit up for a conversation.
5. Great Fairy's Fountain: Hidden behind a wall of rock lives the Great Fairy of Power. Visitors armed with bombs (to blast the wall) and an Ocarina ( to summom the fairy) never leave disappointed.
6. Death Mountain Crater: The entrance to this lies at the top of Death Mountain Trail. Woe betide anyone who treads there unprepared. The scalding temperatures are said to be beyond Hylian endurance.

Zora's River

1. Magic Bean Salesman
2. Frog Chorus
3. Hidden Fairy's Fountain
4. Seal of the Triforce

Zora's Domain
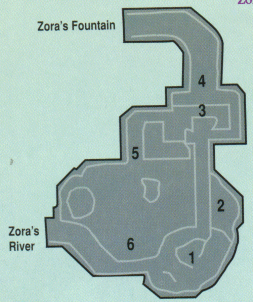
1. The Zora Shop
2. Fishing Hole
3. King Zora's Throne
4. Gate to Zora's Fountain
5. Diving Game
6. Portal to Lake Hylia

Inside Jabu-Jabu's Belly
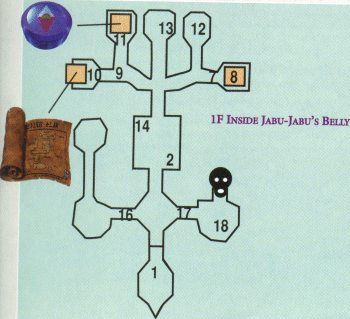
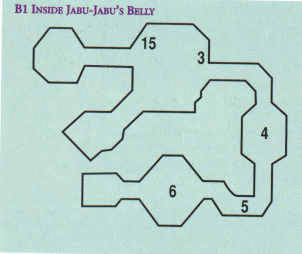
1, Hit the uvula to open the door
2. Meet with Princess Ruto
3. Pick up Ruto and carry her with you
4. Throw Ruto to other bank and step on the switch
5. Hit the switch to open the door
6. Take the platform to 1F
7. Use the weight of 2 people to depress the switch
8. Defeat Four Stingers for the boomerang
9. Leave Ruto on the switch
10. Destroy the Red Tentacle for the Dungeon Map
11. Destroy all the Shaboms in the room in 30 seconds for the compass
12. Destroy the Blue Tentacle
13. Destroy the Tentacle
14. Fall down the tentacle- less hole
15. Enter Bigocto's room
16. Take platform piece down to 1F
17. Use the box to depress the switch
18. Use the boomerang to hit the switch behind the transparent membrane to the boss arena

Forest Temple

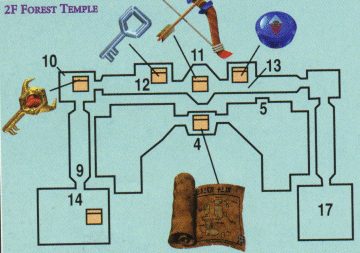

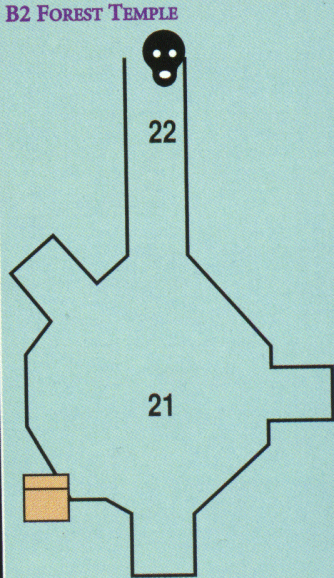
1. Climb the wall to the top of the tree and pick up the Small Key in the chest across the way
2. Defeat two Stalfos for a small key
3. Climb the wall to the room on 2F
4. Defeat Blue Bubble to get dungeon map
5. Hookshot to the switch
6. Climb down the well to get small key
7. Enter the locked door to the west
8. Solve the block puzzle
9. Enter the twisted hallway
10. Jump over to the door on the right
11. Defeat three Stalfos for the Fairy Bow
12. Defeat Joelle the Poe for the small key
13. Defeat Beth the Poe for the compass
14. Shoot the eye to untwist the hallway
15. Get the boss key and drop down the hole into the room
16. Defeat the floormaster for the small key
17. Shoot the ice-covered Eye Switch with the flaming arrow to twist the hallway
18. Avoid the falling ceiling
19. Defeat Amy the Poe
20. Defeat Meg the Poe
21. Push the rotating walls in one complete circuit
22. Unlock the door to the boss arena
